컴퓨터/이론: 안드로이드
[2017.09.18] 07. 커스텀뷰 개념 및 실습
heepie
2017. 9. 18. 12:54
개념
커스텀 뷰란 개발자의 입맛에 맞게 뷰(텍스트 뷰, 버튼 등등)를 수정한 뷰를 말한다.
커스텀 뷰를 생성하는 방법은 크게 2가지가 있다.
1) XML에 속성을 정의 후 호출해 사용하는 방법
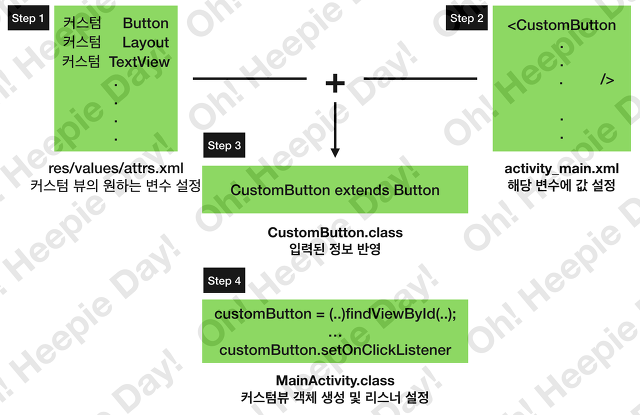
※ attirs.xml의 경우는 안드로이드에서 정한 path의 xml이므로 이름을 변경할 수 없다.
2) 액티비티 안에서 Java 코드를 통해 직접 호출 하는 방법
실습
1) XML에 속성을 정의 후 호출해 사용하는 방법
| <?xml version="1.0" encoding="utf-8"?> <resources> <declare-styleable name="CustomButton"> <attr name="animation" format="string"/> <attr name="delimeter" format="string"/> </declare-styleable> <declare-styleable name="CustomLayout"> <!-- .... --> </declare-styleable> </resources> | cs |
2. CustomButton.class 변수 값 설정
1 2 3 4 5 6 7 8 9 10 11 12 13 14 15 16 17 18 | <com.example.heepie.day015.CustomButton xmlns:custom="http://schemas.android.com/apk/res-auto" app:layout_constraintBottom_toBottomOf="parent" app:layout_constraintLeft_toLeftOf="parent" app:layout_constraintRight_toRightOf="parent" app:layout_constraintTop_toTopOf="parent" android:id="@+id/aniButton" android:layout_height="wrap_content" android:layout_width="wrap_content" android:text="Hello Custom Button!" custom:animation="true" /> <!-- xmlns:custom="http://schemas.android.com/apk/res-auto" 네임태그 설정 헷갈리지 않기 위해 커스텀 변수 설정 animation="true" 설정 --> | cs |
3. CustomButton 클래스 정의
1 2 3 4 5 6 7 8 9 10 11 12 13 14 15 16 17 18 19 20 21 22 23 24 25 26 27 28 29 30 31 32 33 34 35 36 37 38 39 40 41 | public class CustomButton extends AppCompatButton implements View.OnTouchListener{ private AnimatorSet aniSet; private boolean isAni=false; public CustomButton(Context context, AttributeSet attrs) { super(context, attrs); // 1. atrrs.xml에 정의된 속성을 가져온다. TypedArray typed = context.obtainStyledAttributes(attrs, R.styleable.AniButton); // 2. 해당 이름으로 정의된 속성의 개수를 가져온다. int size = typed.getIndexCount(); // 3. 반복문을 돌면서 해당 속성에 대한 처리를 해준다. for(int i =0; i<size; i=i+1) { // 3.1 현재 배열에 있는 속성 아이디 가져오기 int current_attr = typed.getIndex(i); switch (current_attr) { case R.styleable.AniButton_animation: String animation = typed.getString(current_attr); if (animation.equals("true")) { isAni = true; String currentText = getText().toString(); // 원하는 애니메이션 설정 ObjectAnimator aniX = ObjectAnimator.ofFloat(this, "scaleX", 1.2f, 1.0f); ObjectAnimator aniY = ObjectAnimator.ofFloat(this, "scaleY", 1.2f, 1.0f); aniSet = new AnimatorSet(); aniSet.playTogether(aniX, aniY); aniSet.setDuration(3000); } break; } } } public void startAni() { if (isAni) aniSet.start(); } // ... } | cs |
4. MainActivity 정의
1 2 3 4 5 6 7 8 9 10 11 12 13 14 15 16 17 18 | @Override protected void onCreate(Bundle savedInstanceState) { super.onCreate(savedInstanceState); setContentView(R.layout.activity_main); initView(); initListener(); } // ... private void initListener() { aniButton.setOnClickListener(new View.OnClickListener() { @Override public void onClick(View view) { CustomButton.startAni(); } }); } | cs |
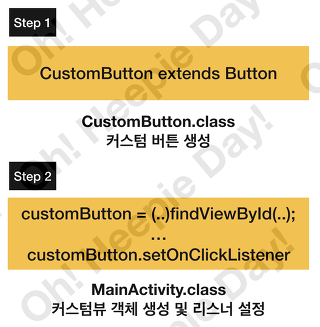
2) 액티비티 안에서 Java 코드를 통해 직접 호출 하는 방법
1. CustomButton 클래스 생성
| public class CustomButton extends AppCompatButton { public CustomButton(Context context) { super(context); setText("hello World"); setBackgroundColor(Color.CYAN); } } | cs |
2. MainActivity 정의
1 2 3 4 5 6 7 8 9 10 11 12 13 14 15 16 17 18 | public class MainActivity extends AppCompatActivity { ConstraintLayout stage; @Override protected void onCreate(Bundle savedInstanceState) { super.onCreate(savedInstanceState); setContentView(R.layout.activity_main); initView(); } private void initView() { stage = (ConstraintLayout)findViewById(R.id.stage); // 레이아웃에 생성한 커스텀 버튼 등록 AniButton aniButton = new AniButton(this); stage.addView(aniButton); } } | cs |
#커스텀 뷰 생성 #커스텀 뷰 개념 #커스텀 뷰 #안드로이드 커스텀 뷰